Monday, July 9, 2012

post party and living room update!

Well, here we are.  July 8th already and the party is obviously over.  It was awesome and we all had a blast.  It was so great to have all our family and friends over and celebrate with the kids and make them feel so special and loved.  I'll share pics from the party soon (I went with a rainbow theme and made a rainbow cake!).


In the meantime, I'll quickly address the birthday list.  Of the 18 items on that list, I made it through 9 of them.  Wop wop....  Oh well, what can you do?  Chalk it up to the usual for me, slightly overzealous with my list-making, but underestimating the time for each and time available for projects.  At the time I was coaching 4 days a week (currently back down to 3) and that coupled with my regular duties of full-time mom, the Etsy shop, etc. just made the rest hard.  But, I'm making my way through the rest and a few new items as well!  I'll post a few of those items soon (new sun shade anyone?).


In the meantime, here's some updated pics of the living room!  Finally you get to see the transformation of the new paint color, as well as the new mirror I added to the space!

Hello kitty! 


the new mirror!


notice this side doesn't have the back painted?


I've since made some changes to this, and it obviously wasn't' filled back in yet also.


I love love *love* the new color.  It's everything I've been wanting - it is a fresh look, it's still neutral, it's a cool color but definitely has warmth to it, and it really seemed to brighten up the space.  This was also my first time painting with Benjamin Moore paints and they are *totally* worth the extra cost in my opinion.  Everything went on in one coat even around the trim work, which almost always needs a second coat.  We'll definitely be using it again!

I also LOVE the new mirror.  I totally broke down and splurged on that one.  I had seen the mirror in Centsational Girls living room.  It was a mirror she had picked up from Lamps Plus and then painted white, which was my plan all along.  Once the mirror arrived and I saw how perfectly it went with the tile on the fireplace I decided to leave it.  

So, where am I in this room?  I need to:
  • finish painting the other bookcase (this is actually done already!)
  • finish the curtains (oh boy, do I have a story on that one for ya!)
  • finish styling the bookcases
  • move the family photo to another wall and add a gallery of frames
  • add a new piece of art in the old photo space
  • add some personal touches to the foyer
  • add some color!
Other than the splurge for the mirror, I'm really trying to do this room on the cheap, so I'm working with what I have and as much as it would be nice to buy new furniture pieces, etc, it's just not part of my plan, so it might happen slowly and will surely evolve over time.  I'll talk about the financial aspect of our spending/decisions in a post soon!  


Tuesday, June 12, 2012

the birthday list

It's been a few weeks.  Summer....the time of relaxation and more flexible schedules, right?  Ha!  Around here summer hit and things went crazy!  Between out of town trips for the hubs, and just juggling our already crazy schedule (my coaching, Noah's Tball and gymnastics, etc.) time for blogging just got away from me.

Another reason?  It's now June.  What is perpetually the craziest month of our year.  Both kids' birthdays, friend birthday parties, garden prep, house projects galore (that we're always trying to get done before the party, etc.).  So, without further ado, I thought I'd share the "pre-birthday party" list with you.  We've actually been crossing stuff off the list - I just haven't blogged about them yet!  Good news is that I do have stuff to share!

The Pre-Birthday Party List:

  1. Deck - clean and scrub down
  2. Gazebo sun shade (mostly done - a little clean-up to do)
  3. Flowers outside
  4. AC/Mulch area (just needs to be de-weeded and cleaned up a bit)
  5. Carpets cleaned (appt scheduled!)
  6. Paint family room
  7. Paint back of bookshelves
  8. Curtains (fabric samples ordered...decided to go another route)
  9. Deep cleaning
  10. Pictures hung and updated
  11. Lilah's dresser (might get pushed to the back burner because I had to add #14 thanks to miss Lilah)
  12. Baby clothes (we have bags given to us from friends since we got rid of a lot of our infant stuff)
  13. Rearrange attic (closely tied to #12)
  14. Lilah's nightstand (um, she decided to draw all over it with non-washable red marker. Did I mention that it's white?)
  15. Laundry room curtain
  16. Touch up playroom paint
  17. Touch up kitchen paint
  18. Touch up trim work
Some of these might be a miracle, to be honest, but this is typically how DIY goes, doesn't it?  Big lists and dreams and schedules that always take longer than we thought.  :-)  Back soon with some finished projects!


Monday, May 14, 2012

bookcase shuffle

The family room bookcase before:


And now after:


Meanwhile, all the books, pictures, etc were transferred to the basement shelves (which have finally been installed).  Nothing is permanent, because I now need to go through everything and get things better organized, displayed, etc.  And the painting of the family room will resume this week, so we'll get to see the two new colors together, instead of the one new color (bookcase) and the one old color (beige).  


Tuesday, May 8, 2012

upstairs hallway: before

Short post today, but just a couple of pics of the upstairs hallway before it was painted, so you can see how filthy the walls were.  Four little hands touch these walls every.single.time they go up and down these stairs.  I've scrubbed them, and while the dirt would come off, the flat paint the builder used was so cheap it would always still look "greasy".  As opposed to the trimwork, done in a nice glossy sheen, which wipes right clean.  Sigh....


The upside is that it's DONE though!  So happy!  


Back with after pictures soon!

Monday, May 7, 2012

room by room: family room

Now that progress has started on the family room, it certainly seems fitting that I would show you what the room looks like *before* we make too much progress.  I'm putting it all out there - the room is clean (well, clean enough...) but I'm keepin' it real - so yes, you'll see my messy bookshelves and all. :-)


Here is the back fireplace wall - looking into the room from the kitchen/eat in area.   


Main fireplace wall.  Plans for new mirror above fireplace (we've had that print for a long time.  I love it, but it's time for something new). 


Built-ins for television and components.  Need to remove pots above (can you say dusty?) because they don't fit the space at all (came with us from Arizona), and there are more plans for the built-ins.


Built-in bookshelves.  Plans for these similar to the television built-ins.


This is the view of the room looking towards the front of the house/foyer.  If you look closely, you can see the new paint job extending down from the upstairs hallway, and the hallway patch job for repairs.  :-)


Room facing the back of the house (west) and the large windows.  The mirror will come down and get moved, and there will be new curtains.  There will also be a new furniture layout, and possibly refinish the end/coffee/console tables.


So there you go!  Next up are some *before* pics of the upstairs hallway before we painted it.  I swear my kids touch the wall every single time they climb up or down those stairs.  So they were filthy!  Keepin' it real....keepin' it real....  

Stay tuned!


Monday, April 30, 2012

family room moodboard

I went ahead and put together a mood board for the family room plans.  Here it is!


The paint color (BM's Camouflage - large paint chip) will be going on all the walls.  The complementary color Smoky Ash (smaller paint chip) will be used in another place or two.  I have plans for wide-stripe horizontal curtains flanking the very large set of windows we have in the space.  We also may use some roman bamboo shades, but the jury is still out on that one (we can't do blinds inside the window because of the extensive moulding).


The sofa we have isn't nearly as "traditional" looking as the one on the board, but at some point in the future we hope to purchase new furniture for the family room and move this stuff to the basement.  If that happens, I hope to purchase a sectional in a more neutral tone.  For now, we're using what we have.  The wood floors are definitely a little ways off.  Because we pay cash for everything we do (and are on plan to have our new Highlander paid off in just a few months) we wouldn't be purchasing flooring until we save up the money for it.  But we will eventually be getting it.


The coffee and side tables we have will be used as well - very craftsman in style and rustic.  So, a nice mix of styles in the space.  We've had them for almost 8 or 9 years now, and I've been thinking about refinishing them somehow (I have an idea in mind!) and I know Derrick would love me to refinish existing furniture rather than consider purchasing new.  The slipper chairs would also be a down-the-line purchase with a new sofa, and thus a new furniture arrangement that I already have in mind.


The mirror is one of my favorite parts so far (well, maybe a tie with the curtains!).  It's actually not the one pictures, but similar in style.  NOT similar in color, but there are plans for that!


UPDATE:  The mirror arrived yesterday and I LOVE it!  I may leave it as is for now, knowing I can always change it later.


The blue and yellow work well with the wall color we've chosen.  In fact, the color in the zig zag pillow is probably the closest in shade to a color that the BM site said works very well with the Camouflage, so it's the color I'm leaning towards for the kitchen.....someday.  :-)  And the yellow *could* change to green.  This is just a plan so far, but we'll see how closely I can stick to it.  It's been fun putting it together, but we'll see how it evolves!


How about you?  Have you ever done a mood board or design plan?  How closely did you stick to it?

Friday, April 27, 2012

new family room color is a GO!

The same day I picked up the yellow paint for the basement bookcases I picked up a 2 ounce sample jar of the Camouflage color I've picked for the family room.  I painted it in a few places in the family room (right next to the fireplace, close to the windows, and on a wall opposite the window that receives direct light).  And, unlike the basement bookcase color - I LOVE it!   Love - seriously.


I'll admit - at first glance, it doesn't seem *that* different than what's on the walls.  But, it feels a bit more sophisticated to me (or maybe I'm just so sick of that builder beige), it feels a bit lighter and softer, and I do love the two-tone feel it has to it like Censational Girl mentioned (a tad gray looking in indirect light, more greenish in direct light).


I'm also hugely looking forward to having anything other than flat walls that I can clean with a damp cloth again!


And in other news, I've purchased something for over the fireplace which I'm super excited about! I think it's all coming together and I'm thinking about doing a mood board before we get started.


So, what do you think of the paint color?  Would you like to see a mood board of the future room?

Wednesday, April 25, 2012

painted bookshelves

Progress?  I chose a coordinating color for the bookshelves, thanks in part to the Benjamin Moore website and the coordinating color choices they provide when you look up a single color.  I entered the blue we used for the basement, and a yellow choice, called Desert Tan is what was provided.  Derrick thought it was too dark, and since he's pretty much giving me full reign of the decorating decisions these days I'm appeasing him where I can.  :-)  So, I found another very similar color called Summer Harvest and bought a quart.


I did the first coat and it was obvious I would need a second.  I painted the second coat and while I like the color and am happy it is done, I will admit.....I don't LOVE the color.  Thoughts?  I'm starting to wonder if maybe a more orange color - such as a pale coral - might be a better choice.  Or, I might just leave it and see how it works once it's all styled.

Decisions, decisions.....

Monday, April 23, 2012

playroom picture frames

We have a bit of a problem in the playroom.  Well, in all fairness it's only a "playroom" problem because that's where I store said items, but I think it's something many parents struggle with.  

Art work overload.  

Yep, being the parent of two kids that go to preschool a few days a week as well as love to do art projects pretty much anywhere, the art projects pile up.  Big time.  I purge as best as I can when they aren't looking (let's be honest, not every thing my kids create is a Picasso) and save the stuff that is really special or unique, but it still piles up like mad.  

I've seen a few ideas on pinterest which I'd like to incorporate sometime down the line.  


Now, this is shown with photographs, but I've seen this idea of photographing all the artwork and displaying as one large collage.  That also suggests that I have the time to go through all the art work, photograph it and organize them, find a way to have it printed (not that I would go that large), etc.  But it's still something I'm thinking of down the line.  

I also like the idea of, and this is a bit more practical for me, to make a yearly book with the artwork from that year in it (by photographing, but still saving special pieces).    

In the meantime, I still wanted a special way to display their artwork and encourage them to continue making such beautiful pieces. 


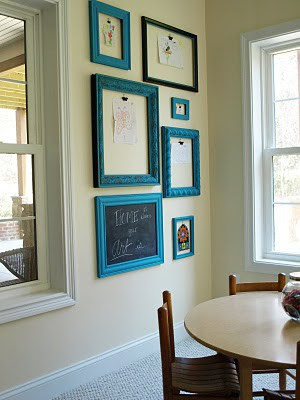
I had seen this display on Pinterest and loved it, and thought frames in a bright fun color would be perfect in the playroom.  I especially love the mix of different sizes and frames, but for now, I went the uniform route.  

Enter, IKEA frames.  And enter, picture placement.  


We bought the frames on our last trip to IKEA (it's a good 2.5-3 hours from us) when we were also buying the BESTA bookcases.  I bought 2 of each in four different sizes.  then I traced each size onto paper the kids had on a roll so I could play with hanging the frames that way instead of trying to actually do it with the frames and putting needless holes in the wall.  It worked really well, and this was the placement I settled on, but I think I changed it twice before landing on this one.  

I then got to work, as I didn't want the white frames - I was thinking orange or yellow, and at our last trip to Lowe's I asked Noah and he voted yellow.  Sold!  

I thought maybe I could just paint them since they are wood, after all, but they almost seem to be covered with a plastic-like coating, so had to go the prime route after all (and really, painting these was just a big huge PITA, to be honest).  


After a few coats of primer, I did the yellow (but forgot to take a picture of that part of the process).  

After putting a sawtooth hanger in the back of each frame, I also used those Command poster strips to keep the frames from getting knocked back and forth on the nail.  I hung them all up, secured the strips, and stepped back to enjoy!


I'll reveal with full artwork when I show you the entire playroom, hopefully soon!  I also still might put some cork into the center of each so that we could just use thumbtacks to secure the artwork....still deciding on that one!

So, how about you?  Do you have any clever ways to store/keep/display your children's artwork? 

Thursday, April 19, 2012

growing

Seeing as how we're growing, not just as a family, but two kids aged 2 and 5 do some pretty nice growing on their own, we've always wanted a nice way to capture it.  Up until now, it's been on our master bath wall.  And as I've mentioned before, builder beige is very blah, as well as won't wipe down well at all, so the walls look filthy (yes, they painted the bathrooms in flat paint).


So, as much as I love this wall with all the markings of my kids' growth, it is time for it to go.  The bathroom needs to be painted, and I want something that could come with us (if we ever moved, but I don't foresee that at any time in the near to distant future).

So a while back, hubby made a white wooden one, but it had no measurement markings on it or anything.  I offered to add them, but never got around to it.  Truth is, I didn't really like the one he made.  He didn't really care for it either - but we were trying to fix a problem.  We knew where we wanted to put it, but yet it never was hung.  This wall is just off the kitchen and playroom and next to our powder room.  Everytime we go on a family trip, we pick up a memento from our travels.  We picked up this carved piece on a trip to Jamaica.  I have a lizard painted in aboriginal style from Australia. a wooden carved turtle from Mexico, and we have a Koa wooden paddle we bought in Hawaii.


This has been hanging here since we moved in, and I decided to evict it for the growth chart - if we ever got around to finishing it/making a new one.   


Then one day I was cruising around various blogs on the web, and found these gorgeous growth charts from Dear Lillie.  I saw that she sold them, but also saw that she followed the tutorial available on the blog 517 creations to make them, so I went ahead and did the same.  It was SUPER easy to make and came together quickly.  But then it sat waiting for a couple coats of poly for, well, a couple months. Sigh....


It's all done and hanging in the hallway where the Jamaica carving once was, and I absolutely love it.  I started the markings (spaced every inch) at 6" and hung it 6" from the ground.  Only thing left to do is take it into the bathroom to transfer all the old markings, and hopefully I'll get to that sooner rather than later.


What do you think?  Do you have a growth chart like this or similar in your home?  Or do you prefer to do it in a doorway/wall/casing of some kind?

Tuesday, April 17, 2012

my favorite kitchen gadgets

I have three that jump out at me.  I love them all for their beauty, simplicity and joy they bring to me in the kitchen.


The first is simple.  It's a couple of mugs that my son bought me for Christmas one year (picked them out himself!).  They are bright and cheerful colors, and are the perfect way to start the day with a hot cup of tea, which I do every morning.


cups of hot tea happen every morning.  cinnamon rolls - not so much.

The second gadget(s) are a couple of berry bowls I recently purchased at Anthropologie.  There's a bigger story here though.  First I owned this gorgeous berry bowl:


It was the most gorgeous berry bowl I'd ever seen.  Purchased from a seller on Etsy, it was small and petite, but perfect for rinsing berries and small bowls of grapes, and was used just about daily.  It was a beautiful robin's egg blue, complete with black specks and everything.  And after more than a year of owning it....it was broken by one of my kids, on accident.  After I loved this bowl so much (and before this one broke), I had purchased another green one from a different seller on Etsy.  This one went into daily rotation.  I was seriously crushed over this one, so I wrote to the seller I originally purchased it from, and begged her to make me another.  She suffers from pretty bad arthritis and doesn't make them anymore, but after a few months, she sent me another.  And then - within 2 weeks - it was broken again.  UGH!!!! The green one was broken within a few months of that.  Sigh...


After that, I was done buying one of a kind handmade items only to have them broken within months.  Do NOT get me wrong - I'm all about supporting handmade and filling your home with these lovely things, but in our case, I just can't purchase super functional items like berry bowls and expect my kids to never touch them.  It's just not practical.  So, I replaced them with these two new ones from Anthropologie, knowing that if they get broken, I won't suffer the same heartbreak I did with the others.  :-(  So, a large aqua and small yellow have a new home in my kitchen.


The third item is a gorgeous handmade maple cutting board made by an amazing seller on Etsy, Red Onion Woodworks.  It's thick, and has incredible graining which seems to glisten when well oiled and cared for.  One side is more solid, and that's our "use everyday" side, and the other has a bit of the natural bark side showing, and so we save that as the "serving" and "entertaining" side.


Mine is actually in need of a little TLC, so I just need to do a bit of sanding and another treatment of mineral oil and we're good to go!


What about you - what go-to kitchen gadgets make you smile in your kitchen?  Check out the Kitchen Gadgets Link Up Party over at Censational Girl to hear about lots more!

Monday, April 16, 2012

the never ending list

I have so many irons in the fire right now, and not just in the world of home improvement, that I thought it might be a good time to create a to-do list for myself, at least as far as the house/blog are concerned so that I can start to tackle things in a prioritized order and not lose sight of some things.  I realize you haven't even seen pictures of some of these rooms, but no fear - we'll eventually get to all of them.


from here


Basement Main

  • possibly get more bookcases to go floor to ceiling
  • paint back of bookcases
  • wall treatment around bookcases
  • touch up paint
  • board and batten
  • light fixtures
  • arrange furniture
  • cover all the boxes

Basement Bath

  • build vanity
  • get new sink
  • purchase/order tile for shower
  • decide on the accent tile & floor tile
  • install ejector pump
  • install toilet
  • install sink and faucet
  • touch up paint
  • hang shower rod and curtain
  • get rug and towels

Family Room

  • choose new paint color
  • fix corner pieces
  • paint
  • paint back of bookshelves
  • re-hang curtain rod
  • decide on shades?
  • diy new curtains
  • new mirror above fireplace
  • declutter the bookshelves
  • more feng shui furniture placement?
  • remove items from tops of bookcases/leave empty or find replacements?

Master Bed/Bath

  • choose new paint color
  • paint
  • update bedding?
  • stencil treatment on headboard wall?
  • window treatment
  • new artwork?
  • move furniture around - one dresser to closet, move armoire to corner
  • add mirror and chair
  • new light fixture

Playroom

  • touch up paint
  • finish artwork/frames project
  • make bench for under window
  • cushion for bench and add other textiles
  • new light fixture

Kitchen

  • paint
  • bamboo roman shades for windows in there
  • so many other ideas - but these are on backburner for now, right hubby?  :-)

Lilah's Room

  • new headboard for queen bed
  • eventually possibly build a twin for her room to increase size of room - move queen to spare
  • finish diy artwork
  • finish ombre dresser (need to repaint drawer fronts)
  • paint nightstand
  • curtains (I spotted a fabric I love)

Noah's Room

  • diy artwork
  • curtains?
  • some beanbag seating for playroom?
By no means is this list considered complete - I'm sure there are items I already intend that I've forgotten or left off.  But it's a good starting point, especially when we honestly have SO many things going on at once.  

How about you - do you have a similar list for your place or just a nice small list?  

Friday, April 13, 2012

craving crisis averted!

Sometimes, the best breakfast is a quick and sweet one.  


This is *so* not a typical breakfast for us mostly-paleo eaters (and probably not the best fuel as I prepare to head out to my Olympic Lifting seminar this weekend).  But you cannot mention certain foods to a pregnant woman (in this case, cinnamon rolls) without her thinking about them every.single.day until she finally has to break down, get some and eat them.  Ahhhhh!  Craving satisfied!


Happy weekend everyone!

Thursday, April 12, 2012

billy built-in, meet besta built in

Remember how I mentioned that we had big plans for the far basement wall?


We knew from the get-go that we wanted some built in shelving and a TV console down there.  Well, we actually have plans to hang a television on the wall (thus the boxes in the middle of the wall there) but we still need a place for the components, thus the console.  

We have beautiful built-ins in our family room that we love (and were actually made custom for us) so we checked with our builder so we could get a quote for the same in the basement.  And the quote was crazy.  Granted - it's a huge wall.  And we wanted floor to ceiling shelving on the sides and a console in the middle....so that adds up.  To the tune of $1800.  Yikes.  On to plan B (which we didn't have - we need a plan B!!!).  

We have the skills and tools to do them ourselves, but that was honestly much more work than we really wanted to take on at this point and we knew it would take us a really long time.  We're both very busy.  Hubby works.  And works out a lot, like me.  I work out, have an Etsy shop, and coach at our CrossFit box, so he's often watching the kids when I'm working, which I'm in turn doing while he's working.  We try not to do too much "working" when we're with our kids, because, well, that's OUR time with them that we'll never get back, kwim?  So, we wanted to explore other options.  

I hit up Pinterest in search of inspiration, and sure enough - happened upon a pin featuring this project by Censtational Girl.  So. Freaking. Awesome.  I had only seen the pin of the bookcases installed - not yet painted or styled, but the finished room is breathtaking.  Love love LOVE those bookcases with the dark blue paint.  As I searched, I found a few more.  


And Chris Loves Julia made theirs a bit different, but also used IKEA cabinets to create a unique, custom piece.  

I was pretty sold.  I showed Derrick some of the pictures, we pulled out the IKEA catalog and realized that we could do this pretty affordably (well, a heck of a lot more affordable than $1800 - that's for sure!).  


One issue though - many of those posts used the roughly 32" Billy bookcases, and four of them, which means that they had walls that were about 128"+.  We have a wall that is about 169"+.  We looked at doing one Billy on each side and something lower for the middle.  Couldn't find a solution.  We thought about a 32" Billy and a 15" Billy and then something lower for the middle.  Still can't find a solution.  Another problem - many of the Billy pieces are not at the 15 3/4" depth, but a more shallow 11".  That seemed to be our main problem with anything we looked at for the center part, actually.  They were either much to shallow, or not even close to the right height.  


So, I went searching through the catalog to see if I could find a piece from a different line that might work in the center. I happened upon the Besta line, and not only found a possible solution for the center, but realized they had tall cabinets as well that we could get and have all the pieces work together.  The solution became two 75" tall bookcases on either side of the wall, 48" wide each.  Then, in the center, two 25" tall pieces, one at 48" wide, the other at 25" wide.  We priced it out, and all four pieces would run us $440.  The two tall pieces were $150 each, and the 48" wide lower unit was $80, and the 25" wide unit was $60.  Probably would make more sense at this point with a picture.  


Here are the pieces all put together and in their spaces.  You can see we have gaps on either side we will have to fill.  Derrick also wanted to build them up on a platform, because we plan on using 5-6" baseboard as part of the board and batten, and in order for it to look seamless, we'll need space for that piece underneath.  Also, he's not thrilled with the height of them (we really wanted floor to ceiling, but we couldn't have bought any more if we wanted to when we were there - well, not if we still wanted to take the kids home in their carseats!) so the platform helps add a little height as well.


Another comment about our plans - we plan to get doors for the far right and left sides (yes, they are one 48" wide unit, but you can get 25" doors for just one side of the unit - so we'll have one side with doors, one without).  We will be doing the same with the center piece - doors on the right and left but open in the center.  


Here is the center unit after Derrick had already secured the solid 48" piece (on the left) to the smaller 25" piece (on the right).  There is a seam line, but you almost can't tell it's there.  Also, we're not as worried about that because once the doors go on, you won't even see the seam.  He's already built the platform for the center here.  


You can also see he extended the center out a few inches past the side bookcases.  We have this done in our built-ins in our family room and love it.  It not only adds architectural interest, but serves a purpose as well.  If Derrick needed to, he could cut out a piece of the back so that a deep component (which he has, ahem) can fit and still get wired to.  No one will ever see the space in the back, because we plan to eventually cover the top with a piece of wood painted to match the other trimwork.  


Here everything is all assembled, on the platform, and secured to the wall (well, sans shelves).  There is an extension piece we can get to put on top of the tall pieces (another reason we chose this over the Besta - I believe the extension piece for the Billy is only 11" deep) but we just haven't decided whether we want to do it right away or wait (and same goes for the doors).  


Can't wait to start adding moulding (is it moulding or molding?  I always thought moulding...) to see it all built in!


A few things:  Yes, the paint in the corners looks horrible.  We plan to add a decorative wall treatment which will hide that once installed anyway.  And I haven't added the shelves because I do plan to paint the back of the shelves.  Just finalizing color choice and then need to get to work!

LinkWithin


House and Home{stead} | Template By Rockaboo Designs | 2012